rss
twitter
    Find out what I'm doing, Follow Me :)

free download Dos Attacking tool | LOIC 1.0.4

DOS ATTACKING TOOL 


If you want to attack on a website by Denial of service attack and you are in search of a tool which can help you in this. Today i have a tool which performs a denial-of-service (DoS) attack (or when used by multiple individuals, a DDoS attack) on a target site by flooding the server with TCP packets, UDP packets, or HTTP requests with the intention of disrupting the service of a particular host. People have used LOIC to join voluntary botnets.
LOIC basically turns your computer's network connection into a firehose of garbage requests, directed towards a target web server. On its own, one computer rarely generates enough TCP, UDP, or HTTP requests at once to overwhelm a web server—garbage requests can easily ignored while legit requests for web pages are responded to as normal. But when thousands of users run LOIC at once, the wave of requests become overwhelming, often shutting a web server (or one of its connected machines, like a database server) down completely, or preventing legitimate requests from being answered. this is a nice tool to perform dos or ddos attack but try it on your own risk. It has no ability to hide your IP address. So attacking on a website may cause a trouble for you.


DOS ATTACK HACK

DOS ATTACK HACK
(DENIAL OF ACCESS)

Then Buy.com, on the day the discount e-tailer went public. One by one, leading sites on the Web have been brought to their knees by so-called denial of service attacks. Such attacks flood a Web server with false requests for information, overwhelming the system and ultimately crashing it. The following graphics explain how such attacks work and how companies can possibly prevent them.

How a "denial of service" attack works
In a typical connection, the user sends a message asking the server to authenticate it. The server returns the authentication approval to the user. The user acknowledges this approval and then is allowed onto the server.
In a denial of service attack, the user sends several authentication requests to the server, filling it up. All requests have false return addresses, so the server can't find the user when it tries to send the authentication approval. The server waits, sometimes more than a minute, before closing the connection. When it does close the connection, the attacker sends a new batch of forged requests, and the process begins again--tying up the service indefinitely.
Typical connection
"Denial of service" attack

How to block a "denial of service" attack
One of the more common methods of blocking a "denial of service" attack is to set up a filter, or "sniffer," on a network before a stream of information reaches a site's Web servers. The filter can look for attacks by noticing patterns or identifiers contained in the information. If a pattern comes in frequently, the filter can be instructed to block messages containing that pattern, protecting the Web servers from having their lines tied up.

Creating a Windows XP Unattended Installer


Creating a Windows XP Unattended Installer


This is an old guide but still very useful and deserve a descent update. I'm shock that many people still doesn't know about this small utility that can be found in their Windows XP Installer.
"Lawrence, It's almost two months now since you release the latest update of your software winbubble, do you have new releases coming soon? anyway, I have a question. How do I automate the installation of Windows XP? - Jared"
WinBubble is still in development and I'm still Shaping my skills. Surely, Everybody will benefit from my studies and Please stay tuned always. Thanks in advance.
Ok, Let's go back from the main topic. Open your Windows XP Installer and explore the following path: [Disc]SUPPORT\TOOLS
deploycab
Note: I recommend to download the latest one for Windows XP Service Pack 3, Download here
According to Microsoft the latest deploy.cab supports:
Windows XP; Windows XP Service Pack 1; Windows XP Service Pack 2; Windows XP Service Pack 3
1. Copy the file Deploy.cab to any directory and Extract the files...
2. Click the Useful utility setupmgr.exe and if your using Windows Vista Run the File as Administrator.
3. Follow the Pictures below:
d1
d2
d3
d4
d5
Now, you can enter your Name, Organization, Time Zone, Administrator Password, Display Settings, Product Key, Networking and other settings.
final
Note: In Windows Vista OS, Don't Set the Time Zone... Just proceed byClicking to the other options.
Go to the location where you save the file Unattended.txt andRename to WINNT.SIF and Place to I386 Folder of your Installer.
I made some Template if you don't want to use the software.
[Data]
    AutoPartition=1
    MsDosInitiated="0"
    UnattendedInstall="Yes"
[Unattended]
    UnattendMode=ProvideDefault
    OemPreinstall=No
    TargetPath=\WINDOWS
[GuiUnattended]
    AdminPassword="Enter_your_Passw0rd_here"
    EncryptedAdminPassword=NO
    AutoLogon=Yes
    AutoLogonCount=1
    OEMSkipRegional=1
[UserData]
    ProductKey=XXXXX-XXXXX-XXXXX-XXXXX-XXXXX
    FullName="Enter_your_Name_here"
    OrgName="HomeUser"
    ComputerName= Enter_your_Computer_Name_here
[Identification]
    JoinWorkgroup=WORKGROUP
[Networking]
    InstallDefaultComponents=Yes
Save it as WINNT.SIF and place that to your Windows XP Installer directory I386.

SYSTEM INFO IN ONE CLICK..........HAVE FUN


Profiler: Get the most important System Information about your computer in one location


 SystemSummary

The new version of WinGuggle (version 2.1) aims to provide the most useful System Information in one location. The new tool gathers key information such Basic System Summary, Audio and Video Codecs, Display Drivers, Storage Disks and Drives, Network, Display adapter and many more.
The new feature is recommended for checking the specifications of your computer and for those people that wants to upgrade their laptop to a newer version of Operating system such as Windows 7 or Vista. Run or refresh the System Summary feature in a separate disk like removable storage or flash drives and it will automatically save that information for reference purposes incase you encounter a problem on audio and video drivers and hardware information that you need.
System Information
The tool gathers information for the following items:
  • The OS name and version
  • Computer Name
  • Original Equipment Manufacture System Information (manufacturer, model, and type)
  • Processor, BIOS Version/Date and SMBIOS Version
  • Windows and System Directory
  • Boot Device
  • Locale
  • Hardware Abstraction Layer or OS version
  • User name
  • Time Zone
  • The amount of memory and system resources
  • Page File Path
Storage Drives and Disk
This is one of the most useful information that the tool gathers. It provides you with the detailed information about your Hard Drives.

Audio and Video Drivers
The tool lists video card, monitor information, name and manufacturer of sound device(s), audio and video drivers information and version. Great tool if you want to upgrade or install a new operating system.
Network Adapter and Protocol
Lists network adapter information such as Network protocol information in greater details related to how it operates on the network.
and many more….
The future versions of the software (now in development stage) will have the ability to import and export data and provides more detailed information about your system.
Enjoy

TRACE IP USING NSLOOKUP TOOL.....HACK IT


Using NSLOOKUP command to get IP and DNS Information


dos3Name Server Lookup or nslookup displays DNS information to test and troubleshoot DNS servers including IP address of a particular machine running in TCP/IP protocol.

Non-Interactive mode
C:\Windows\system32>nslookup /?
Usage:
   nslookup [-opt ...]         # interactive mode using default server
   nslookup [-opt ...] - server   # interactive mode using 'server'
   nslookup [-opt ...] host       # look up 'host' using default server
   nslookup [-opt ...] host server # look up 'host' using 'server'
common usage: nslookup [-option] [hostname] [server]
This is being use if you want for a single piece of information e.g. performing a reverse lookup on an IP address.
C:\Windows\system32>nslookup 72.14.203.121
Default Server:  sn3.dli.bit.net
Address:  201.4.2.9
Name:    tx-in-f121.1e100.net
Address:  72.14.203.121
C:\Windows\system32>nslookup unlockforus.blogspot.com
Default Server:  sn3.dli.bit.net
Address:  201.4.2.9
Non-authoritative answer:
Name:    blogspot.l.google.com
Address:  64.233.189.191
Aliases:  unlockforus.blogspot.com
C:\Windows\system32>nslookup you.wikidot.com
Default Server:  sn3.dli.bit.net
Address:  201.4.2.9
Non-authoritative answer:
Name:    www1.s.wikidot.com
Address:  74.86.234.149
Aliases:  you.wikidot.com


USING THE COMMAND TO TEST AND TROUBLSHOOT DNS SERVERS
Note: Before using this tool in interactive mode, you should be familiar with how DNS works.
Interactive mode
Simply type “nsloolup” and “?” to display all the available commands.
C:\Windows\system32>nslookup
Default Server:  sn3.dli.bit.net
Address:  201.4.2.9
> ?
Commands:   (identifiers are shown in uppercase, [] means optional)
NAME            - print info about the host/domain NAME using default server
NAME1 NAME2     - as above, but use NAME2 as server
help or ?       - print info on common commands
set OPTION      - set an option
    all                 - print options, current server and host
    [no]debug           - print debugging information
    [no]d2              - print exhaustive debugging information
    [no]defname         - append domain name to each query
    [no]recurse         - ask for recursive answer to query
    [no]search          - use domain search list
    [no]vc              - always use a virtual circuit
    domain=NAME         - set default domain name to NAME
    srchlist=N1[/N2/.../N6] - set domain to N1 and search list to N1,N2, etc.
    root=NAME           - set root server to NAME
    retry=X             - set number of retries to X
    timeout=X           - set initial time-out interval to X seconds
    type=X              - set query type (ex. A, AAAA, A+AAAA, ANY, CNAME, MX, NS, PTR, SOA, SRV)
    querytype=X         - same as type
    class=X             - set query class (ex. IN (Internet), ANY)
    [no]msxfr           - use MS fast zone transfer
    ixfrver=X      - current version to use in IXFR transfer request
server NAME     - set default server to NAME,                       using current default server
lserver NAME    - set default server to NAME, using initial server
finger [USER]   - finger the optional NAME at the current default host
root            - set current default server to the root
ls [opt] DOMAIN [> FILE] - list addresses in DOMAIN (optional: output to FILE)
    -a          -  list canonical names and aliases
    -d          -  list all records
    -t TYPE     -  list records of the given RFC record type (ex. A,CNAME,MX,NS,
PTR etc.)
view FILE           - sort an 'ls' output file and view it with pg
exit            - exit the program
You can read for more information about the tool: HERE

Error Messages from Microsoft Windows XP Article
Descriptions
Timed out
The server did not respond to a request after a certain amount of time and retries. You can set the time-out period with the set timeout subcommand retries with the set retry sub command.
No response from server No DNS name server is running on the server computer.
No records The DNS name server doesn’t have resource records of the current query type for the computer, although the computer name is valid. The query type is specified with the set querytype command.
Nonexistent domain
The DNS domain name doesn’t exist.
Connection refused or Network is unreachable The connection to the DNSname server or fingerserver could not be made. This error commonly occurs with ls and finger requests.
Server failure
The DNS nameserver found an internal inconsistency in its database and could not return a valid answer.
Refused The DNS server refused to service the request.
Format error The DNSname server found that the request packet was not in the proper format. It may indicate anerror in nslookup.
Have Fun Learning!

find mac address of any pc....hack it


Using GetMAC Tool to display MAC address for Network Adapters


dos3Media Access Control (MAC) address is the computer’sphysical address inside the network. This tool will help you to configure your router(s) to allow only specific computers to access the network or internet. Thanks to William for asking this question last December 16, 2009.
If your computer has more than one network adapter, the MAC address of each adapter is listed separately.
Using the tool to display the network adapters mac address
D:\>getmac
Physical Address    Transport Name
=================================================
00-19-8B-DB-69-1D   \Device\Tcpip_{793CAA85-159E-4EC7-9986-FD793610261B}
00-1B-76-2D-B1-DE   Media disconnected
D:\>
Other Parameters of the tool
D:\>getmac /?
GETMAC [/S system [/U username [/P [password]]]] [/FO format] [/NH] [/V]
Description:
    This tool enables an administrator to display the MAC address
    for network adapters on a system.
Parameter List:
    /S     system        Specifies the remote system to connect to.
    /U     [domain\]user  Specifies the user context under
                             which the command should execute.
    /P     [password]   Specifies the password for the given
                             user context. Prompts for input if omitted.
    /FO    format        Specifies the format in which the output
                             is to be displayed.
                             Valid values: "TABLE", "LIST", "CSV".
    /NH                      Specifies that the "Column Header" should
                               not be displayed in the output.
                               Valid only for TABLE and CSV formats.
    /V                       Specifies that verbose output is displayed.
    /?                       Displays this help message.
Examples:
    GETMAC /?
    GETMAC /FO csv
    GETMAC /S system /NH /V
    GETMAC /S system /U user
    GETMAC /S system /U domain\user /P password /FO list /V
    GETMAC /S system /U domain\user /P password /FO table /NH
D:\>
Anyhow, if your a windows fan and you don’t like the name, you can still use another network tool called ipconfig to get the network adapters physical address (alternative name to mac address)
C:\>ipconfig /all
Ethernet adapter Local Area Connection:
   Connection-specific DNS Suffix  . :
   Description . . . . . .  : Broadcom NetXtreme 57xx Gigabit Controller
   Physical Address. . . . . . . . . : 00-19-8B-DB-69-1D
   DHCP Enabled. . . . . . . . . . . : Yes
   Autoconfiguration Enabled .  . : Yes

Hope this helps!

How To Download Torrent Files With IDM!


How To Download Torrent Files With IDM!


I am going to post new technique that how to download your torrent files using IDM. IDM is a best download that provides maximum download speed by splitting the files into parts. IDM supports maximum 16 connection at a time. And you can download your torrent files more fast.

Advantages Of Downloading Using IDM


  • You can download torrent files with less seeds
  • You get maximum downloading speed
  • You can save your downloading time
  • Safe way to download file.


Follow the ways to Download with IDM


1.First go to Zbigz.com.

2.Signup for a free account there.

3.Then Go to any Torrent Search Engines.

4.Download One Torrent file into your computer.

5.Goto Zbigz and upload your torrent file

5.Then press Go

6.Click on free account and Again click free Press Go

7.After Upload you must get Download link

8.Click on download button and Enjoy A Fast Download Using IDM

DATE CRACKER, never worry about date


reactivate a software after expiry dates ends using RUNASDATE


Get Registered Software's after expiry date 


Hack Software to Run the Trial Program ForeverIn this post, I will show you how to hack a Software and run the trial program forever. Most of us are familiar with many software programs that run only for a specified period of time in the trial mode. Once the trial period is expired, these programs stop functioning and demand for a purchase.
However, there is a way to run the software programs so that they function beyond the trial period. Isn’t this interesting?
Well, before I tell you how to hack the software and make it run in the trial mode forever, we will have to first understand how the licensing scheme of these programs work. I’ll try to explain this in brief.
When the software programs are installed for the first time, they make an entry into the Windows Registry with the details such as Installed Date and Time, installed path etc. After the installation, every time you run the program, it compares the current system date and time with the installed date and time. With this, it can make out whether the trial period is expired or not.
So, with this being the case, just manually changing the system date to an earlier date will not solve the problem. For this purpose there is a small tool known as RunAsDate.
RunAsDate is a small utility that allows you to run a program in the date and time that you specify. This utility doesn’t change the current system date, but it only injects the date/time that you specify into the desired application.
RunAsDate intercepts the kernel API calls that returns the current date and time (GetSystemTime, GetLocalTime, GetSystemTimeAsFileTime), and replaces the current date/time with the date/time that you specify. It works with Windows 2000, XP, 2003, Vista and 7.
You can download RunAsDate from the following link:

Steps to Hack the Software and Run the Trial Program Forever:

You will have to follow these tips carefully to successfully hack a software and make it run in the trial mode forever:
  1. Note down the date and time, when you install the software for the first time.
  2. Once the trial period expires, you must always run the software using RunAsDate.
  3. After the trial period is expired, do not run the software(program) directly. If you run the software directlyeven once, this hack may no longer work.
  4. It is better and safe to inject the date of the last day in the trial period.
For example, if the trial period expires on jan 30 2009, always inject the date as jan 29 2009 in the RunAsDate. I hope this helps! Please express your experience and opinions through comments
.

Block any app, trialed by chrome


block Google chrome using applocker


Hai, here i am going to share with you the tricks to block applications using security policy

Step 1. Edit the Group Policy Object that is targeted to the computer you want to apply this policy. Navigate to Computer Configuration > Policies > Windows Settings > Security Settings > Application Control Policies and then click on “Configure rule enforcement”

image
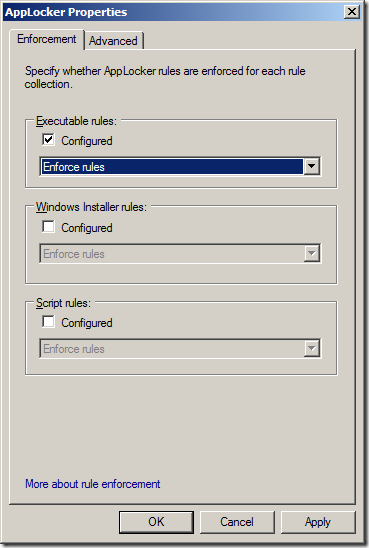
Step 2. Under Executable rules tick “Configured” and select the “Enforce rules” option from the pop-down menu then click “OK”.
image
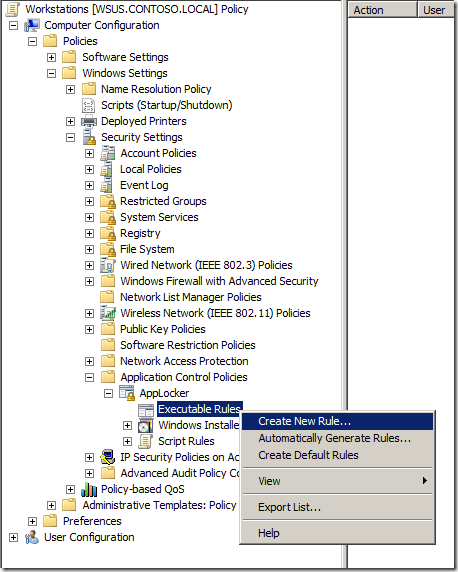
Step 3. Right click on “Executable Rules” and click on “Create New Rule..”
image
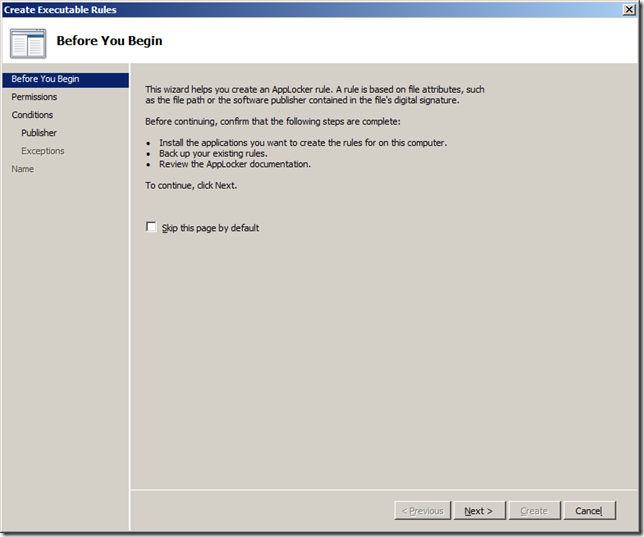
Step 4. Click “Next”
image
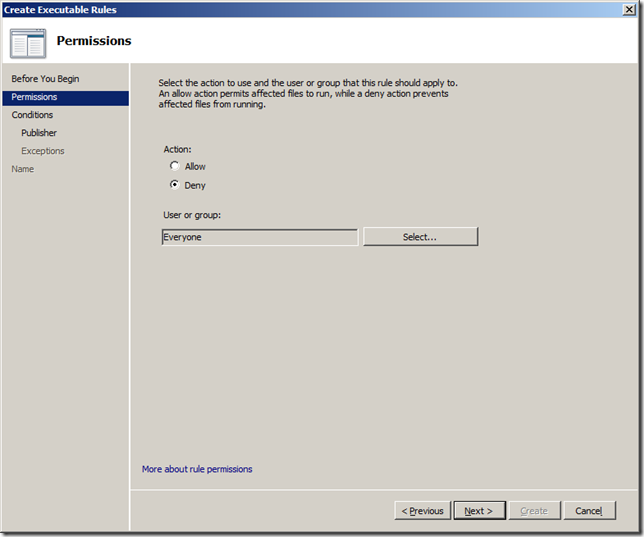
Step 5. Select “Deny” and then click “Next”
image
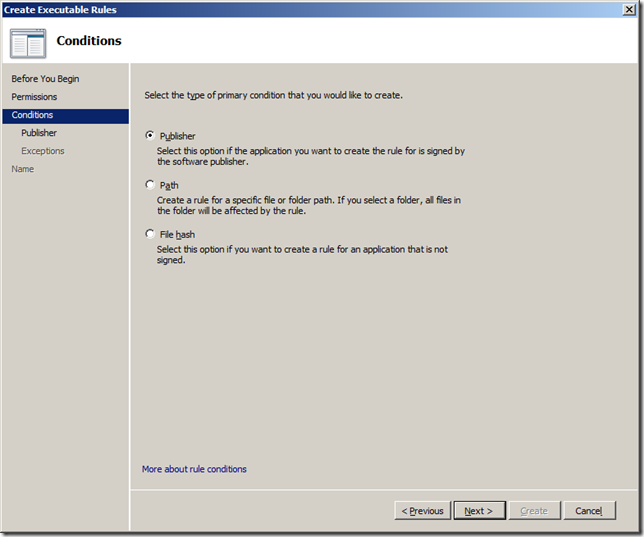
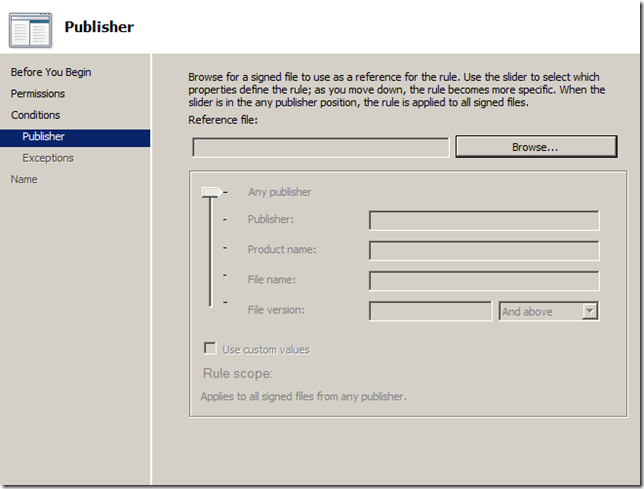
Step 6. Select “Publisher” condition and click “Next”
Note: The “Path” and “File hash” option are the same condition as was available in a software restriction policy that was in Windows XP and Vista.
image
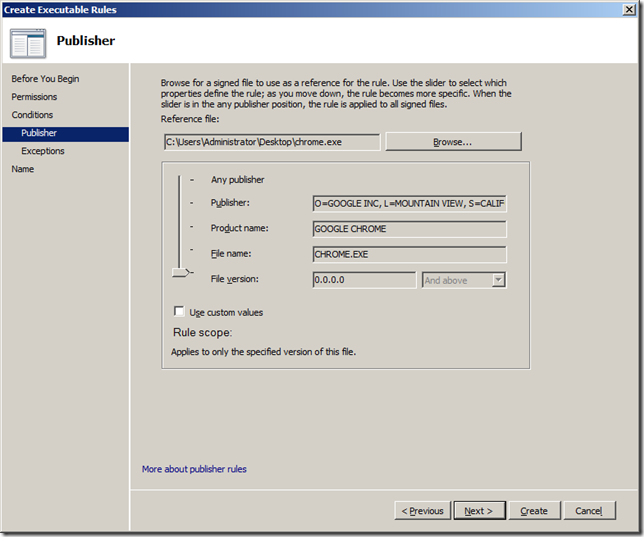
Step 7. Click on “Browse”
image 
Step 8. Select the “chrome.exe” executable file and click “Open”
image
Step 9. In this example we are just going to accept the defaults and click “Next”.
Optional: If you wanted to just block a particular version of browser (or program) or just any version below a certain number tick “Use custom values” and then enter the version number in the “File version” field and select “And Below” from the pop-down menu.
image  
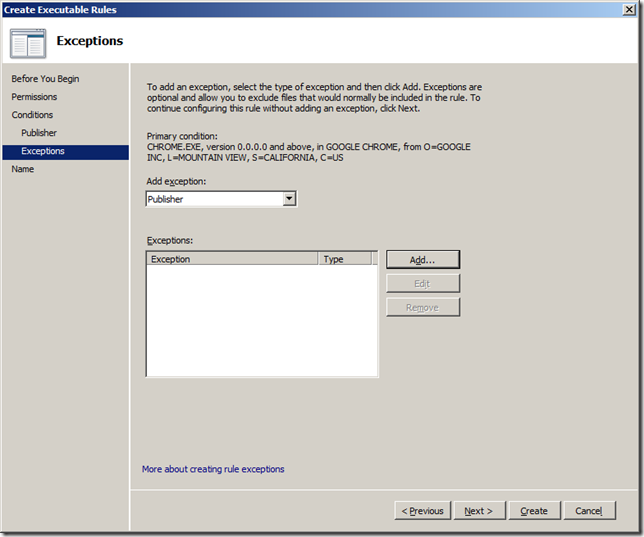
 Step 10: Click “Next”
image 
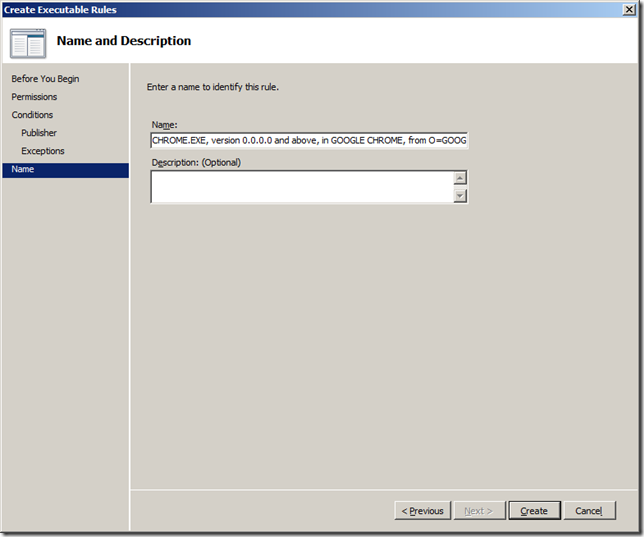
Step 11: Click “Create”
image 
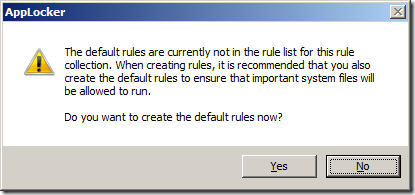
Step 12: You will now be prompted to create some default rules that ensure that you don’t accidently stop Windows from working. Click “Yes” to this if you don’t already have these rules created.
image 
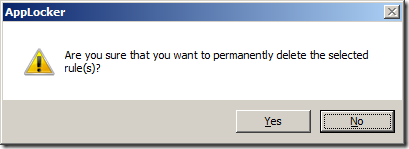
Step 13 (Optional): If you also want this AppLocker rule to apply computer administrators then right-click on the “BUILTIN\Administrators” rule and click “Delete”
image
Step 14 (Optional): Click “Yes”
image
You AppLocker Rules are now setup and should now look like this…
 image
Now there is one more thing you need to do to enable AppLocker on the computer…
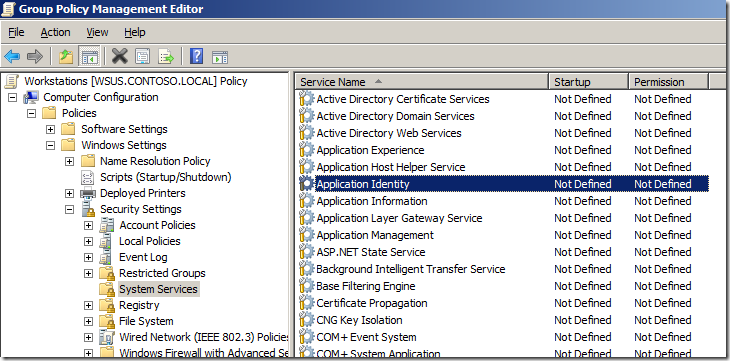
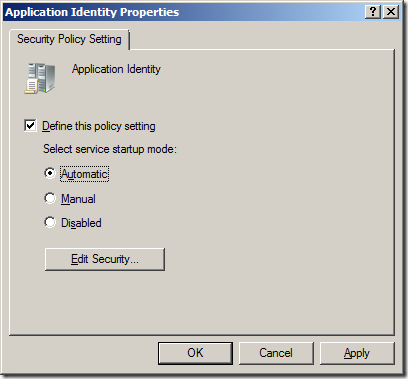
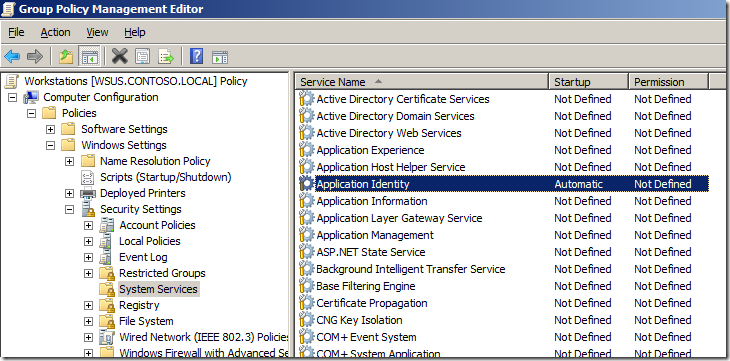
Step 15. In the same Group Policy Object you were just editing navigate to Computer Configuration > Policies > Windows Settings > Security Settings > System Services and double click on the “Application Identity” service.
Note: This is the process that scan’s all the file before they are executed to check the name, hash or signature of the executable before it is run. If this is not turned on then AppLocker will simple now work.
image
Step 16: Tick “Define this policy setting” and tick “Automatic” then click “OK”
image
The services section should now look like this…
image
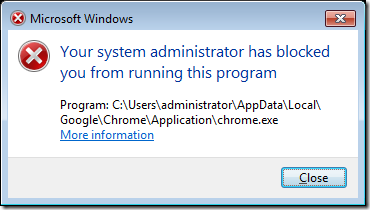
Your all done… Now when the user tries to run an un-approved browser (or program) they will be presented to this dialogue box…
image
Now if you want to make sure you have covered all the bases below is a an image of the AppLocker rules configured with a few more denied browsers…
image

Copy any locked & unreadable Cd's & Dvd's


ISO Buster(Copy any locked & unreadable Cd's & Dvd's)


Download Here : https://www.sugarsync.com/pf/D8750833_66555229_26586

                           or Download or Download


CD, DVD, BD and HD DVD data recovery software !

                                IsoBuster is an award winning , highly specialized and easy to use CD, DVD and blu-ray (BD, HD DVD) data recovery tool.
It supports all CD / DVD / BD / HD DVD formats and all common file-systems ... Rescue lost files from a bad or trashed CD or DVD disc, save important documents, precious pictures, video from the 
family, your only system backup, ... IsoBuster can do it all ! 

FUD CRYPTER, HIDE YOUR TROJANS


What is FUD Crypter ? Free Download Latest version 2012

What Is FUD Crypter?
FUD is acronym for fully undetectable.It is a software that can be used to encrypt your exe files.

What is the use of FUD Crypter?
FUD crypters can be used to encrypt viruses,RAT,keyloggers,spywares etc to make them undetectable from antiviruses.


How Does FUD Crypter Work?

The Basic Working Of FUD Crypter is explained below
The Crypter takes the original binary file of you exe and applies many encryption on it and stores on the end of file(EOF).So a new crypted executable file is created.

Original Exe
 Crypted Exe
001————- 010                                      101————-110
100|Original File|000->  Cryptor  ->010|Original File|110
010————- 111                                        110————-010
The new exe is not detected by antiviruses because its code is scrambled by the crypter.When executed the new .exe file decrypts the binary file into small the data small pieces at a time and injects them into another already existing process or a new empty one, OR it drops the code into multiple chunks in alternative data streams(not scanned by most a/v) then executes it as a .txt or .mp3 file.

Why Most FUD Crypters Donot Work?

As a FUD crypter becomes popular it also get the eyes of antivirus companies.The antivirus companies update their software and employ detection mechanism that detect the encryption’s by the crypter.So, most of the popular FUD crypter are easily detected by antiviruses.

Where can I test Whether my Crypter is FUD or not?
To test you crypter encrypt any virus with it and test it onhttp://vscan.novirusthanks.org and make sure you check the boxDo not distribute the sample .

Note:-Donot test your crypter on virustotal.com as it distributes the samples and your crypter will not remain FUD if you scan with virustotal.

Where can I Download a Free FUD crypter?

As I already mentioned that as the crypter becomes popular it doesnot remain FUD.So the only FUD crypter available are those made by indivuals and they can be found by spending a little time on google by searching.It will not make profit to anybody if I share my FUD crypter here as it will not remain FUD for long as some noobs will surely scan it with virustoal.So,its better you search your own and keep it to yourself.

Download Free FUD Crypter

I am giving you a link to a free crypter so that you can play it with and test whether it is FUD or not.


KEYLOGER DOWNLOAD


KEYLOGER DOWNLOAD


This is a nice collection of' "must have" tools for a hacker such as RAT, keylogger, mail bomber, crypter etc. The advantage of using this package is that all the tools are joined under the same GUI and all the tools are FUD i.e. they will not be detected by your antivirus. So I advice you to use them at your own risk. Alternatively you can useSandboxie or Deep Freeze to protect your computer if something unexpected happens.