Remember the situation, signing into your account with just a single click because browser is saving all your passwords for you. We know this is convenient but since you’re not typing your passwords any-more, eventually you’ll forget your password in a few days. For security reasons, the password field in all browsers is masked with “asterisks” which won’t allow any third person (even you) to read the origi-nal typed password. But, what if you want to reveal the string behind the asterisks? There is actually few workaround for revealing the original passwords behind the asterisk and over the entire course of this article we’ll be discussing some known ways to reveal the characters behind the asterisks in different browsers.
Reveal Passwords Behind Asterisks or Dots in Different Web Browsers:
Google Chrome:
Starting off with Google chrome, the easiest way to reveal the original passwords behind the asterisk is using inbuilt Inspect element feature in the browser.
You just need to right click on the password field in the browser where you will get an option "Inspect Element".
After clicking on it, "Web Inspector" will open out and there you can see some code which is basically Html code and you just need to replace the "password" word with "text" word and it will reveal the words behind the asterisks.
There’s another way using JavaScript which is quite quick and easy as compared to above method. Just open a site that allows users to login and after typing the password, just enter the following JavaScript code in the address bar.
After entering the above code in the address bar, press enter and it will pop up a window with your password written on it.
Mozilla Firefox:
The Next most common browser is "Mozilla Firefox".
The chrome's "Web Inspector" trick is also applicable in Firefox.
Open a site that asks for login (like Facebook), right click on the password field in the browser where you will get an option "Inspect Element". After clicking on it, "Web Inspector" will open out and there you can see some code which is basically Html code and you just need to replace the "password" word with "text" word and it will reveal the words behind the asterisks as shown in screenshot below.
Apart from this, there’s another way which is quite quick and easy as compared to above method. For that you’ve to create a bookmark with the following JavaScript code as URL in it.
After saving this as a bookmark, open a site that allows users to login and after typing the password, open the saved bookmark by clicking on it and it will pop up a window with your password written on it.
Opera:
Next comes the "Opera" in that you can use "Dragonfly", which is an in built tool, to reveal the words behind the asterisks just like chrome's "Web Inspector". Open a site that asks for login (like Facebook), right click on the password field in the browser and select "Inspect Element" option. After clicking on it, "Dragon Fly" will open out and you’ll see some code which is basically Html code and you just need to replace the "password" word with "text" word and it will reveal the words behind the asterisks as shown in screen shot below.
Internet Explorer:
In the same manner you can apply this trick on Internet explorer. First of all open any site (Gmail in our case) that allows user login. Now for bringing out “developer tools” press thef12 key. A new window will be opened and press Ctrl+B to enable selection of elements. After that go to login page and select the password field, doing this will take you to the password field’s code in developer window (highlighted by yellow). Now, you just need to replace the "password" word with "text" word and it will remove the asterisk mask in the password field, see screenshot below.
Apart from this, there’s another way which is quite quick and easy as compared to above method. Just open a site that allows users to login and after typing the password, just enter the following JavaScript code in the address bar.
alert(document.getElementById('Passwd').value);
After entering the above code in the address bar, press enter and it will pop up a window with your password written on it. (See pic below)
Wrap Up:
Although there are so many tools out there to help you in revealing the words behind the asterisks and to get the saved passwords with in a browser, you still need to keep your system safe and protected by using "Antivirus" plus "Firewall" to avoid stealing of these passwords by someone who have access to your system. If you can use these tools to reveal your saved passwords then others can also use the same ways to get information of yours
How to Install and Run Android in PC [Windows and Linux]
The mobile smartphone and tablet industry seems to have a very prominent divide, with a lot of consumers having their favorite operating system and choosing to stick to hardware which is powered by their chosen OS. Obviously fans of Apple’s iOS use the iPhone and iPad devices, whereas Android lovers have a wide range of hardware to choose from due to the fact that the OS is available to multiple manufacturers.
Here are Some Steps Given to Install Android On Your PC.
Step 1: Install official Oracle VM VirtualBox Go Here & download the relevant VirtualBox binary for your computers operating system (Windows/Mac OS X/Linux/Solaris)
Step 4: Locate the downloaded ‘Android-v4.7z‘ file and extract the contents of it.
Step 5: Once the Android-v4.7z file has been opened, locate a file called ‘Android-v4.vbox‘ which can be directly opened in Virtualbox
Step 6: Double click on the Android-v4.vbox file which will load the VirtualBox application and boot up the ICS file.
Step 7: When the boot menu is presented in VirtualBox, press ‘start‘ on the top toolbar and then if required select the ‘Android Startup from /dev/sda‘ option.
Step 8: All steps are complete. Android 4.0 ICS should now be booting up allowing you to enjoy that Android in your PC, It just look like a TABLET
Top 12 Android Apps to Turn Your Smartphone into a Hacking Device
Mobile devices is now very common now a days and mobile devices has changed the way of bi-directional communication. There are many operating system for mobile devices available but the most common and the best operating system for mobile is Android, it is an OS means you can install other applications (software's) on it. InAndroid application usually called apps or android apps.
The risk of hacking by using mobile devices is very common and people are developing and using different apps (application) for their hacking attack. Android has faced different challenges from hacking application and below is the list of application for android hacking.
1. SpoofApp
Here is an app that spies at heart could use – SpoofApp. It allows you to use a fake Caller ID – a number that you are free to specify yourself, in order to protect your privacy or to pull a prank on someone. Sounds like fun, doesn’t it? Well, Apple didn’t think so, which is why it never allowed the app to enter its App Store. Google, however, didn’t mind, which is why SpoofApp was available on the Android Market for about two and a half years. However, it was banned from there last year as it allegedly was in conflict with The Truth in Caller ID Act of 2009.This can be useful in social engineering.
Requirements: Android 2.1+ (rooted) Overview: FaceNiff is an Android app that allows you to sniff and intercept web session profiles over the WiFi that your mobile is connected to.
It is possible to hijack sessions only when WiFi is not using EAP, but it should work over any private networks (Open/WEP/WPA-PSK/WPA2-PSK). It’s kind of like Firesheep for android. Maybe a bit easier to use (and it works on WPA2!). Please note that if webuser uses SSL this application won’t work.
Legal notice: This application is for educational purposes only. Do not try to use it if it’s not legal in your country. I do not take any responsibility for anything you do using this application. Use at your own risk
Overview:The most of the times you scan the Wi-Fi networks available around, they’re protected with key. Penetrate is an app that help you out with that. If the routers of that Wi-Fi networks are encrypted with WEP/WPA it will bring you the keys to access them. This seems a sort of cracking, but the developers says it isn’t, because it’s supposed to get the keys for penetration testing and you should use it only with permission from network owners. Well, apart from those regardings, it does what it says. Check the developer description to know which routers are supported.
Take in account that if you have an antivirus installed in your device, it will warn you about this app. The developer says it’s normal because it’s a security-related tool. Penetrate isn’t a danger for your phone.
This is the paid version (€1.99) that contains no ads, some more features and sponsors further development. What’s more, it allows you to use 3G to get the password instead of using dictionaries that you will have to download in the free version.
Penetrate works properly with the range of routers supported. We’re missing more though. Despite the apparent use for which it was developed this application, we all know the “regular” use. And if you’re looking for it, give it a chance. It’s a great app.
Anti-Android Network Toolkit is an app that uses WiFi scanning tools to scan networks. You can scan a network you have the phone connected to or you can scan any other nearby open networks. Security admins can use Anti to test network host vulnerabilities to DoS attacks and other threats.
Nmap is a network scanner tool which gives the entire information of the ip address and website. There is a version of nmap for Android users too, with the help of this app hackers can scan the ip's through mobiles. Download it from here
7. The Android Network Toolkit
The Android Network Toolkit is an complete tool kit for the pentesters , where hackers can find expolots using the mobile and penetrate or attacks the ip's according to their vunerabilities.
Secure shell or SSH is the best protocol that provides an extra layer of security while you are connecting with your remote machine.SSHDroid is a SSH server implementation for Android. This application will let you to connect to your device from a PC and execute commands (like "terminal" and "adb shell").
WiFi Analyzer is one of the most popular applications in the Android Marketplace, which is really a testament to how wildly useful this tool is for both the average user and the more technically inclined. In the most basic of terms, WiFi Analyzer is a tool to scan the area for WiFi networks and determine which channel is the least populated so you can adjust your own hardware to a less congested part of the spectrum.
ConnectBot is an exceptionally well done SSH/Telnet client, which also acts as a terminal emulator for the local Linux sub-system. While there are better terminal emulators (though not for free), there is no question that ConnectBot is the absolute best SSH client available for Android.
Network Discovery is a handy tool for finding and enumerating devices on public WiFi networks. Network Discovery uses a simple ping scan to find hosts on the network, and then allows the user to select one of the found hosts to target for a TCP connect() scan.
Download it from here Bonus : dSploit dSploit is an Android network analysis and penetration suite which aims to offer to IT securityexperts/geeks the most complete and advanced professional toolkit to perform network security assesments on a mobile device. Once dSploit is started, you will be able to easily map your network, fingerprint alive hosts operating systems and running services, search for known vulnerabilities, crack logon procedures of many tcp protocols, perform man in the middle attacks such as password sniffing ( with common protocols dissection ), real time traffic manipulation, etc, etc .
Microsoft Windows Explorer is great for general file management tasks. However, there are several more complicated tasks that Windows Explorer is unable to handle. This is where Multi Commander can come in handy. Multi Commander is a fantastic and free file manager that allows you to manage your files and perform many tasks not possible through Windows Explorer. In the picture, is an example of the Multi Commander interface. As can be seen, the interface is very similar to Windows Explorer with additional features such as multiple panes, tabs, and buttons.
---Some of the many features in Multi Commander---
*Compare the right and left file explorers with each other and show what is different. *Built using Extension/Plug-in architecture that allows for almost any imaginable feature to be added. *Easily filter and copy or move only the files specified in the filter. *Excellent keyboard support for anyone who enjoys keyboard shortcuts or just avoiding the mouse. *Convert files between Unix (LF), Windows (CRLF), and Mac (CR) format. *Browse and read files within a RAR without extracting the files. *Quickly change a file or folder name to all lowercase, all uppercase, or Camel case. *Browse, update, and modify the system registry. *Create and verify the MD5 and SFV (CRC32) Checksum of files using the MC-Checksum extension. *Tab support to have multiple folders open at once. *Script engine support to create scripts to automate tasks. *FTP support. *Save and load a selection of files and folders to memory or to a file.
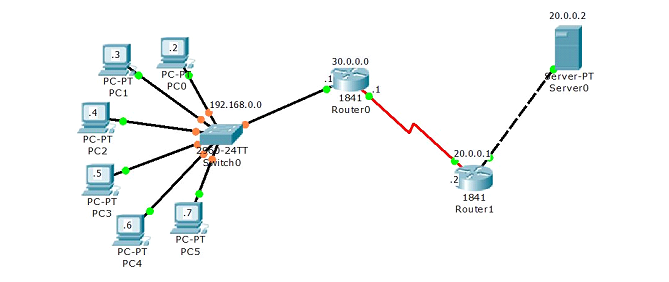
In this article I will demonstrate an example of OSPF Routing configuration. We will use four different series router so you can get familiar with all different platform covered in CCNA exam. Create a topology as shown in figure.
1841 Series Router0 (R1)
FastEthernet0/0
Serial0/0/0
IP address
10.0.0.1
20.0.0.1
Connected With
Pc0
R2 on Serial 0/0
2811 Series Router0 (R4)
FastEthernet0/0
Serial0/0/0
IP address
50.0.0.1
40.0.0.2
Connected With
Pc1
R3 on Serial 0/0
2621XM Series Router0 (R3)
FastEthernet0/0
Serial0/0/0
IP address
30.0.0.2
40.0.0.1
Connected With
FastEthernet0/0
R4 on Serial 0/0/0
2620XM Series Router1 (R2)
FastEthernet0/0
Serial0/0
IP address
30.0.0.1
20.0.0.2
Connected With
R3 on FastEthernet0/0
R1 on Serial 0/0/0
PC-PT PC0
FastEthernet0
Default Gateway
IP address
10.0.0.2
10.0.0.1
Connected With
R1 on FastEthernet0/0
PC-PT PC1
FastEthernet0
Default Gateway
IP address
50.0.0.2
50.0.0.1
Connected With
R4 on FastEthernet0/0
Configuring OSPF is slightly different from configuring RIP. When configuring OSPF, use the following syntax:
Router(config)# router ospf process_ID
Router(config-router)# network IP_address wildcard_mask area area_#
The process_ID is locally significant and is used to differentiate between OSPF processes running on the same router. Your router might be a boundary router between two OSPF autonomous systems, and to differentiate them on your router, you will give them unique process IDs. Note that these numbers do not need to match between different routers so they have nothing to do with autonomous system numbers.
To configure any router double click on it and select CLI.To configure this topology use this step by step guide.
(1841Router0) Hostname R1
To configure and enable ospf routing on R1 follow these commands exactly.
Router>enable
Router#configure terminal
Enter configuration commands, one per line.  End with CNTL/Z.
Router(config)#hostname R1
R1(config)#interface fastethernet 0/0
R1(config-if)#ip address 10.0.0.1 255.0.0.0
R1(config-if)#no shutdown
%LINK-5-CHANGED: Interface FastEthernet0/0, changed state to up
%LINEPROTO-5-UPDOWN: Line protocol on Interface FastEthernet0/0, changed state to up
R1(config-if)#exit
R1(config)#interface serial 0/0/0
R1(config-if)#ip address 20.0.0.1 255.0.0.0
R1(config-if)#clock rate 64000
R1(config-if)#bandwidth 64
R1(config-if)#no shutdown
%LINK-5-CHANGED: Interface Serial0/0/0, changed state to down
R1(config-if)#exit
%LINK-5-CHANGED: Interface Serial0/0/0, changed state to up
R1(config)#router ospf 1
R1(config-router)#network 10.0.0.0 0.255.255.255 area 0
R1(config-router)#network 20.0.0.0 0.255.255.255 area 0
R1(config-router)#exit
R1(config)#
(2620XM-Router1) Hostname R2
To configure and enable ospf routing on R2 follow these commands exactly.
Router>enable
Router#configure terminal
Enter configuration commands, one per line.  End with CNTL/Z.
Router(config)#hostname R2
R2(config)#interface serial 0/0
R2(config-if)#ip address 20.0.0.2 255.0.0.0
R2(config-if)#no shutdown
%LINK-5-CHANGED: Interface Serial0/0, changed state to up
%LINEPROTO-5-UPDOWN: Line protocol on Interface Serial0/0, changed state to up
R2(config-if)#exit
R2(config)#interface fastethernet 0/0
R2(config-if)#ip address 30.0.0.1 255.0.0.0
R2(config-if)#no shutdown
%LINK-5-CHANGED: Interface FastEthernet0/0, changed state to up
R2(config-if)#exit
%LINEPROTO-5-UPDOWN: Line protocol on Interface FastEthernet0/0, changed state to up
R2(config)#router ospf 2
R2(config-router)#network 20.0.0.0 0.255.255.255 area 0
R2(config-router)#network 3
00:03:10: %OSPF-5-ADJCHG: Process 2, Nbr 20.0.0.1 on Serial0/0 from
 LOADING to FULL, Loading Done0.0.0.0 0.255.255.255 area 0
R2(config-router)#network 30.0.0.0 0.255.255.255 area 0
R2(config-router)#exit
R2(config)#
(2620XM-Router2)Hostname R3
To configure and enable ospf routing on R3 follow these commands exactly.
Router>enable
Router#configure terminal
Enter configuration commands, one per line.  End with CNTL/Z.
Router(config)#hostname R3
R3(config)#interface fastethernet 0/0
R3(config-if)#ip address 30.0.0.2 255.0.0.0
R3(config-if)#no shutdown
%LINK-5-CHANGED: Interface FastEthernet0/0, changed state to up
%LINEPROTO-5-UPDOWN: Line protocol on Interface FastEthernet0/0, changed state to up
R3(config-if)#interface serial 0/0
R3(config-if)#ip address 40.0.0.1 255.0.0.0
R3(config-if)#clock rate 64000
R3(config-if)#bandwidth 64
R3(config-if)#no shutdown
%LINK-5-CHANGED: Interface Serial0/0, changed state to down
R3(config-if)#exit
%LINK-5-CHANGED: Interface Serial0/0, changed state to up
%LINEPROTO-5-UPDOWN: Line protocol on Interface Serial0/0, changed state to up
R3(config)#router ospf 3
R3(config-router)#network 40.0.0.0 0.255.255.255 area 0
R3(config-router)#network 30.0.0.0 0.255.255.255 area 0
00:04:53: %OSPF-5-ADJCHG: Process 3, Nbr 30.0.0.1 on FastEthernet0/0 from
 LOADING to FULL, Loading D
R3(config-router)#exit
R3(config)#
%SYS-5-CONFIG_I: Configured from console by console
R3#
(2811Router3) Hostname R4
To configure and enable ospf routing on R4 follow these commands exactly.
Router>enable
Router#configure terminal
Enter configuration commands, one per line.  End with CNTL/Z.
Router(config)#interface serial 0/0/0
Router(config-if)#ip address 40.0.0.2 255.0.0.0
Router(config-if)#no shutdown
%LINK-5-CHANGED: Interface Serial0/0/0, changed state to up
%LINEPROTO-5-UPDOWN: Line protocol on Interface Serial0/0/0, changed state to up
Router(config-if)#exit
Router(config)#interface fastethernet 0/0
Router(config-if)#ip address 50.0.0.1 255.0.0.0
Router(config-if)#no shutdown
%LINK-5-CHANGED: Interface FastEthernet0/0, changed state to up
%LINEPROTO-5-UPDOWN: Line protocol on Interface FastEthernet0/0, changed state to up
Router(config-if)#exit
R4(config)#router ospf 4
R4(config-router)#network 50.0.0.0 0.255.255.255 area 0
R4(config-router)#network 40.0.0.0 0.255.255.255 area 0
R4(config-router)#
00:06:32: %OSPF-5-ADJCHG: Process 4, Nbr 40.0.0.1 on Serial0/0/0 from
LOADING to FULL, Loading Done
R4(config-router)#exit
R4(config)#
PC-1
PC>ipconfig

IP Address......................: 10.0.0.2
Subnet Mask.....................: 255.0.0.0
Default Gateway.................: 10.0.0.1

PC>ping 50.0.0.2

Pinging 50.0.0.2 with 32 bytes of data:

Reply from 50.0.0.2: bytes=32 time=156ms TTL=124
Reply from 50.0.0.2: bytes=32 time=127ms TTL=124
Reply from 50.0.0.2: bytes=32 time=156ms TTL=124
Reply from 50.0.0.2: bytes=32 time=140ms TTL=124

Ping statistics for 50.0.0.2:
    Packets: Sent = 4, Received = 4, Lost = 0 (0% loss),
Approximate round trip times in milli-seconds:
    Minimum = 127ms, Maximum = 156ms, Average = 144ms
PC>
PC-2
PC>ipconfig

IP Address......................: 50.0.0.2
Subnet Mask.....................: 255.0.0.0
Default Gateway.................: 50.0.0.1

PC>ping 10.0.0.2

Pinging 10.0.0.2 with 32 bytes of data:

Reply from 10.0.0.2: bytes=32 time=140ms TTL=124
Reply from 10.0.0.2: bytes=32 time=141ms TTL=124
Reply from 10.0.0.2: bytes=32 time=157ms TTL=124
Reply from 10.0.0.2: bytes=32 time=156ms TTL=124

Ping statistics for 10.0.0.2:
    Packets: Sent = 4, Received = 4, Lost = 0 (0% loss),
Approximate round trip times in milli-seconds:
    Minimum = 140ms, Maximum = 157ms, Average = 148ms
You can verify that ospf is running successfully via show ip protocols command in privilege mode.
R4#show ip protocols

Routing Protocol is "ospf 4"
  Outgoing update filter list for all interfaces is not set
  Incoming update filter list for all interfaces is not set
  Router ID 50.0.0.1
  Number of areas in this router is 1. 1 normal 0 stub 0 nssa
  Maximum path: 4
  Routing for Networks:
    50.0.0.0 0.255.255.255 area 0
    40.0.0.0 0.255.255.255 area 0
  Routing Information Sources:
    Gateway         Distance      Last Update
    40.0.0.1             110      00:01:26
  Distance: (default is 110)

R4#
You can use show ip route command to troubleshoot ospf network. If you did not see information about any route checks the router attached with that network.
R4#show ip route
Codes: C - connected, S - static, I - IGRP, R - RIP, M - mobile, B - BGP
       D - EIGRP, EX - EIGRP external, O - OSPF, IA - OSPF inter area
       N1 - OSPF NSSA external type 1, N2 - OSPF NSSA external type 2
       E1 - OSPF external type 1, E2 - OSPF external type 2, E - EGP
       i - IS-IS, L1 - IS-IS level-1, L2 - IS-IS level-2, ia - IS-IS inter area
       * - candidate default, U - per-user static route, o - ODR
       P - periodic downloaded static route

Gateway of last resort is not set

O    10.0.0.0/8 [110/1564] via 40.0.0.1, 00:02:37, Serial0/0/0
O    20.0.0.0/8 [110/1563] via 40.0.0.1, 00:02:37, Serial0/0/0
O    30.0.0.0/8 [110/782] via 40.0.0.1, 00:02:37, Serial0/0/0
C    40.0.0.0/8 is directly connected, Serial0/0/0
C    50.0.0.0/8 is directly connected, FastEthernet0/0
R4#
To test ospf routing do ping from pc1 to pc2 and vice versa. If you get replay then you have successfully configured ospf routing but if you did not get replay double check this configuration and try to troubleshoot. I have uploaded a configured and tested topology in case you are unable to locate the problem spot then download this configuration file. And try to find out where have you committed mistake


 Boot the system and log in into grub.


.png)


